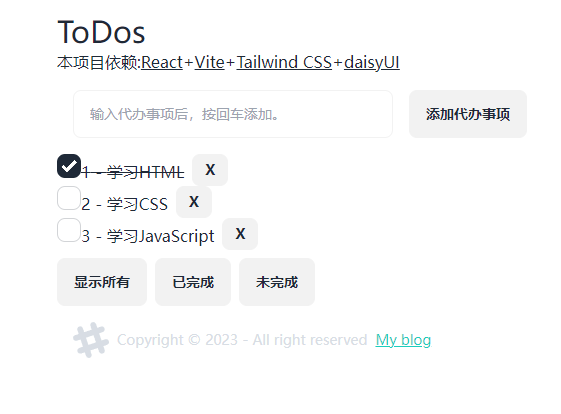
闲来无事,琢磨着体验一下react吧,花了一天的时间看了看react的官方文档,然后能照着以前用vue写的ToDo使用react重构了一遍,这里简单记录并总结一下学习过程。
效果如下:

环境搭建
关于React+Vite+TailwindCSS+daisyUI的环境搭建之前写过一篇博客,这里就不在重复了,传送门:<a href="https://suiyan.cc/2023/20230626075924.html" target="_blank">前端React+TailwindCSS+daisyUI开发环境的快速搭建</a>,环境的搭建很简单的,大家看看就能明白了。
编写ToDo
ToDo的核心就是把一个存有待办事项的数组通过react渲染出来,增删改查就是对数组的一些最基本的操作的操作,但是这些操作由于普通的数组操作有所不同,我们来看看官方给出的解释:
在 JavaScript 中,数组只是另一种对象。同对象一样,你需要将 React state 中的数组视为只读的。这意味着你不应该使用类似于 arr[0] = 'bird' 这样的方式来重新分配数组中的元素,也不应该使用会直接修改原始数组的方法,例如 push() 和 pop()。
相反,每次要更新一个数组时,你需要把一个新的数组传入 state 的 setting 方法中。为此,你可以通过使用像 filter() 和 map() 这样不会直接修改原始值的方法,从原始数组生成一个新的数组。然后你就可以将 state 设置为这个新生成的数组。
下面是常见数组操作的参考表。当你操作 React state 中的数组时,你需要避免使用左列的方法,而首选右列的方法:
<table><thead><tr><th></th><th>避免使用 (会改变原始数组)</th><th>推荐使用 (会返回一个新数组)</th></tr></thead><tbody><tr><td>添加元素</td><td><code class="inline text-code text-secondary dark:text-secondary-dark px-1 rounded-md no-underline bg-gray-30 bg-opacity-10 py-px">push</code>,<code class="inline text-code text-secondary dark:text-secondary-dark px-1 rounded-md no-underline bg-gray-30 bg-opacity-10 py-px">unshift</code></td><td><code class="inline text-code text-secondary dark:text-secondary-dark px-1 rounded-md no-underline bg-gray-30 bg-opacity-10 py-px">concat</code>,<code class="inline text-code text-secondary dark:text-secondary-dark px-1 rounded-md no-underline bg-gray-30 bg-opacity-10 py-px">[...arr]</code> 展开语法(<a class="inline text-link dark:text-link-dark border-b border-link border-opacity-0 hover:border-opacity-100 duration-100 ease-in transition leading-normal" href="#adding-to-an-array">例子</a>)</td></tr><tr><td>删除元素</td><td><code class="inline text-code text-secondary dark:text-secondary-dark px-1 rounded-md no-underline bg-gray-30 bg-opacity-10 py-px">pop</code>,<code class="inline text-code text-secondary dark:text-secondary-dark px-1 rounded-md no-underline bg-gray-30 bg-opacity-10 py-px">shift</code>,<code class="inline text-code text-secondary dark:text-secondary-dark px-1 rounded-md no-underline bg-gray-30 bg-opacity-10 py-px">splice</code></td><td><code class="inline text-code text-secondary dark:text-secondary-dark px-1 rounded-md no-underline bg-gray-30 bg-opacity-10 py-px">filter</code>,<code class="inline text-code text-secondary dark:text-secondary-dark px-1 rounded-md no-underline bg-gray-30 bg-opacity-10 py-px">slice</code>(<a class="inline text-link dark:text-link-dark border-b border-link border-opacity-0 hover:border-opacity-100 duration-100 ease-in transition leading-normal" href="#removing-from-an-array">例子</a>)</td></tr><tr><td>替换元素</td><td><code class="inline text-code text-secondary dark:text-secondary-dark px-1 rounded-md no-underline bg-gray-30 bg-opacity-10 py-px">splice</code>,<code class="inline text-code text-secondary dark:text-secondary-dark px-1 rounded-md no-underline bg-gray-30 bg-opacity-10 py-px">arr[i] = ...</code> 赋值</td><td><code class="inline text-code text-secondary dark:text-secondary-dark px-1 rounded-md no-underline bg-gray-30 bg-opacity-10 py-px">map</code>(<a class="inline text-link dark:text-link-dark border-b border-link border-opacity-0 hover:border-opacity-100 duration-100 ease-in transition leading-normal" href="#replacing-items-in-an-array">例子</a>)</td></tr><tr><td>排序</td><td><code class="inline text-code text-secondary dark:text-secondary-dark px-1 rounded-md no-underline bg-gray-30 bg-opacity-10 py-px">reverse</code>,<code class="inline text-code text-secondary dark:text-secondary-dark px-1 rounded-md no-underline bg-gray-30 bg-opacity-10 py-px">sort</code></td><td>先将数组复制一份(<a class="inline text-link dark:text-link-dark border-b border-link border-opacity-0 hover:border-opacity-100 duration-100 ease-in transition leading-normal" href="#making-other-changes-to-an-array">例子</a>)</td></tr></tbody></table>以下为全部代码,我已标上了注释,不难应该能看懂:
import { useState, useEffect } from "react";
import "./App.css";

const tds = [
{ id: 1, content: "学习HTML", done: true },
{ id: 2, content: "学习CSS", done: false },
{ id: 3, content: "学习JavaScript", done: false },
];

function App() {
const [todos, setTodos] = useState(JSON.parse(localStorage.getItem('myreacttodos')) || []);// 存储待办事项
const [displayOption, setDisplayOption] = useState("all"); // 过滤待办事项的选项
const [newtodo, setNewTodo] = useState("");// 添加代办事项


useEffect(()=>{
    localStorage.setItem('myreacttodos',JSON.stringify(todos))
},[todos])

/**
* 添加ToDo
*/
function addToDo() {
    if (todos.length === 0) {
    // 数组为空的情况处理代码
    // 可以选择初始化一个默认值,例如:
    const newId = 1;
    console.log(newId);
    setTodos([{ id: newId, content: newtodo, done: false }]);
    setNewTodo("");
    } else {
    // 数组不为空的情况处理代码
    const newId = Math.max(...todos.map((t) => t.id)) + 1;
    console.log(newId);
    setTodos([...todos, { id: newId, content: newtodo, done: false }]);
    setNewTodo("");
    }
}

/**
* 按回车添加待办事项
* @param {input 键盘事件} e
*/
function keyReturn(e) {
    if (e.keyCode === 13) {
    addToDo();
    }
}

/**
* 移除ToDo
*/
function removeToDo(id) {
    setTodos(todos.filter((t) => t.id !== id));
}

/**
* 更新ToDo
*/
function renewToDo(id, ck) {
    let newTodos = todos.map((t) =>
    t.id === id ? { ...t, done: ck === true ? true : false } : t
    );
    setTodos(newTodos);
}

// 处理按钮点击事件
const handleDisplayOption = (option) => {
    setDisplayOption(option);
};

// 根据选项过滤待办事项
const filteredTodos = todos.filter((todo) => {
    if (displayOption === "completed") {
    return todo.done;
    } else if (displayOption === "incomplete") {
    return !todo.done;
    } else {
    return true; // 显示所有事项
    }
});

return (
    <div className="container mx-auto max-w-xl p-4">
    <h1 className="text-3xl">ToDos</h1>
    <div>
        本项目依赖:
        <a className="link" src="https://react.docschina.org/" target="_blank">
        React
        </a>
        +
        <a className="link" src="https://cn.vitejs.dev/" target="_blank">
        Vite
        </a>
        +
        <a className="link" src="https://cn.vitejs.dev/" target="_blank">
        Tailwind CSS
        </a>
        +
        <a
        className="link"
        src="https://daisyui.com/docs/install/"
        target="_blank"
        >
        daisyUI
        </a>
    </div>
    <div className="p-4">
        <input
        value={newtodo}
        onChange={(e) => setNewTodo(e.target.value)}
        onKeyDown={(e) => {
            keyReturn(e);
        }}
        type="text"
        placeholder="输入代办事项后,按回车添加。"
        className="input input-bordered w-full input-md max-w-xs"
        />
        <button className="btn mx-4" onClick={addToDo}>
        添加代办事项
        </button>
    </div>
    <ul>
        {filteredTodos.map((todo) => (
        <li key={todo.id} className="flex gap-2">
            <div>
            <input
                onChange={(e) => renewToDo(todo.id, e.target.checked)}
                type="checkbox"
                checked={todo.done}
                className="checkbox"
                id={"todo" + todo.id}
            />
            <label
                className={todo.done ? "line-through" : ""}
                htmlFor={"todo" + todo.id}
            >
                {todo.id} - {todo.content}{" "}
            </label>
            </div>

            <button onClick={() => removeToDo(todo.id)} className="btn btn-sm">
            X
            </button>
        </li>
        ))}
    </ul>

    <div className="flex gap-2 mt-2">
        <button onClick={() => handleDisplayOption("all")} className="btn">
        显示所有
        </button>
        <button
        onClick={() => handleDisplayOption("completed")}
        className="btn"
        >
        已完成
        </button>
        <button
        onClick={() => handleDisplayOption("incomplete")}
        className="btn"
        >
        未完成
        </button>
    </div>
    <footer class="footer items-center p-4 text-neutral-content">
        <div class="items-center grid-flow-col">
        <svg
            width="36"
            height="36"
            viewBox="0 0 24 24"
            xmlns="http://www.w3.org/2000/svg"
            fill-rule="evenodd"
            clip-rule="evenodd"
            class="fill-current"
        >
            <path d="M22.672 15.226l-2.432.811.841 2.515c.33 1.019-.209 2.127-1.23 2.456-1.15.325-2.148-.321-2.463-1.226l-.84-2.518-5.013 1.677.84 2.517c.391 1.203-.434 2.542-1.831 2.542-.88 0-1.601-.564-1.86-1.314l-.842-2.516-2.431.809c-1.135.328-2.145-.317-2.463-1.229-.329-1.018.211-2.127 1.231-2.456l2.432-.809-1.621-4.823-2.432.808c-1.355.384-2.558-.59-2.558-1.839 0-.817.509-1.582 1.327-1.846l2.433-.809-.842-2.515c-.33-1.02.211-2.129 1.232-2.458 1.02-.329 2.13.209 2.461 1.229l.842 2.515 5.011-1.677-.839-2.517c-.403-1.238.484-2.553 1.843-2.553.819 0 1.585.509 1.85 1.326l.841 2.517 2.431-.81c1.02-.33 2.131.211 2.461 1.229.332 1.018-.21 2.126-1.23 2.456l-2.433.809 1.622 4.823 2.433-.809c1.242-.401 2.557.484 2.557 1.838 0 .819-.51 1.583-1.328 1.847m-8.992-6.428l-5.01 1.675 1.619 4.828 5.011-1.674-1.62-4.829z"></path>
        </svg>
        <p>Copyright © 2023 - All right reserved</p> <a className="link link-accent" src="https://suiyan.cc">My blog</a>
        </div>
    </footer>
    </div>
);
}

export default App;
总结
程序并没有做数据的持久保存,可以使用浏览器API:localStorage来保存待办事项的数组,这样下次打开浏览器就会显示之前保存的数据了,代码中已经更新添加了使用localStorage存储待办事项的存储代码。
另外,通过ToDo这个小项目分别使用vue和react编写,也算是对两大框架有了入门级的体验,总体来说,vue在学习过程中上手更为简单,适合从未接触过这类框架的新手来学习,如果你有不错的JavaScript和前端项目的编写经验,我还是推荐使用react,react更接近原生的写法,虽然没有太多的语法糖,但是兼容更简单,react官方文档写的太死板了,对新手不太友好,总之,这二个都是非常不错的前端框架,都值得去学习去使用。